This is an old revision of the document!
Table of Contents
:fr:install-header&nofooter
Magic Lantern v2.3 - Guide d'installation
Ce guide ne concerne que la version 2.3 de Magic Lantern. Nous ne pourrons pas fournir d'informations ni d'assistance pour les versions βéta ou les nightly builds. Nous vous recommandons donc vivement de n'utiliser que les versions officielles de Magic Lantern. Celles-ci sont largement testées et éprouvées.
Avant d'installer Magic Lantern, vous devez:
- Savoir utiliser un ordinateur (télécharger une archive zip, la décompresser, ouvrir un fichier PDF…)
- Nous vous conseillons d'utiliser votre appareil photo pendant quelques mois afin d'en maitriser correctement l'ensemble des fonctions d'origine. La suite logique sera d'installer Magic Lantern!
- Renseignez-vous. Ce site recèle de nombreuses informations. Lisez le Guide d'Utilisation, la F.A.Q, explorez les articles et la documentation…
- Soyez patients: Magic Lantern peut parfois submerger le nouvel utilisateur par la profusion de ses fonctions, mais son utilisation s'avère simple dés lors qu'on en maîtrise les bases.
Très Important
- Magic Lantern v2.3 utilise une organisation de fichiers différente des versions précédentes. Pour cette raison, il est fortement recommandé de formater votre carte flash et de réaliser une nouvelle installation complète.
- Lorsque vous ouvrer la trappe de la carte, attendez toujours la confirmation fournie par le clignotement unique de la LED avant de retirer la carte de son logement (ou attendez 5 secondes). Le firmware Canon accède en effet à la carte pendant ce cours laps de temps. Si vous retirez la carte trop rapidement, l'appareil se bloquera tout en continuant à utiliser l'énergie de la batterie (l'EOS 550D n'est pas concerné par ce problème).
Vérifier la version du Firmware Canon
 Les mises à jour du microprogramme peuvent potentiellement endommager l'appareil. Merci de lire attentivement les informations relatives dans votre manuel d'utilisation Canon. Si vous ne vous sentez pas prêt à assumer ces risques, fermez le manuel et ne tentez pas cette installation!
Magic Lantern v2.3 fonctionne uniquement avec les versions de firmware suivantes:
fr:install-firmware-links&nofooter
Vous pouvez vérifier votre version actuelle en réglant la molette de l'appareil sur Manuel (M) et en parcourant le menu.
Rien de dramatique ne se passerait si vous tentiez de faire fonctionner ML sur une version de firmware différente - La LED de la carte flash clignoterait indéfiniment et il vous faudrait retirer la batterie. Magic Lantern effectue en effet un test de la version du firmware présent avant son démarrage effectif.
Première Installation
Étape 1. Préparer l'appareil Photo
- Chargez complètement la batterie;
- Retirez tous les accessoires éventuels tels que flash externe ou poignée-batterie;
- Pour une première installation, utiliser une carte SD/SDHC/CF de 32 Go ou moins. Les cartes de 64Go ou plus ne fonctionne pas pour une installation initiale (mais vous pourrez les utiliser ensuite);
- Assurez-vous de disposer d'un lecteur de carte;
- Vérifiez bien la version de Firmware Canon qui équipe votre appareil;
- Positionner la molette de réglage principale sur Manuel (M);
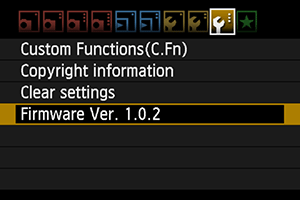
- Recommandation: Réinitialiser tous les réglages de l'appareil (
Clear settings, voir image précédente). Notez bien que toutes vos préférences ou styles personnalisés seront perdus!
Étape 2. Installation
- Format the card in the camera (low-level format).
- Unzip all of the files from Magic Lantern zip archive to the root of your card.
- Launch the Firmware Update process.
- If the card LED is blinking for more than a few seconds, upgrade your Canon firmware from the links above (even if you already have the correct firmware version number!) and try again.
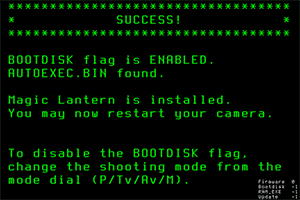
- Once you see the green confirmation screen, restart your camera. Done.
- If something goes wrong, check the Troubleshooting section.
Étape 3. Premier lancement de Magic Lantern
- Go to Canon menus and restore your preferences. Don't forget these:
- On 550D/60D/600D, enable manual video exposure.
- On 5D Mark II and 50D, enable LiveView shooting.
- You may also have to re-install your custom picture styles.
- In LiveView, toggle the INFO/DISP button until you see the Magic Lantern audio levels and footer bar.
- Press the DELETE button to open ML menu and READ THE HELP TEXT that pops up.
- Read the User Guide and start using Magic Lantern.
- Don't forget to wait for LED confirmation before removing the card! (unless you use a 550D)
Installer Magic Lantern sur d'autres cartes
- If you use SD/SDHC/CF cards, you may simply repeat Step 2 on every card you would like to use Magic Lantern.
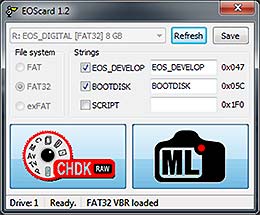
- If you use SDXC cards, or if you prefer to skip the firmware update step and prepare all your cards from the PC, you may copy ML files on your card and make it bootable with a special utility: EOScard for Windows, MacBoot for Mac, or make_bootable.sh for Mac/Linux in command line.
Mise à jour de Magic Lantern
- To update to v2.3 from an earlier version, format your card(s), update to latest Canon firmware if needed, unzip new ML files and make the card(s) bootable. If you get stuck, do a fresh install.
- Check the Download page for updates.
- To install a nightly build or an experimental version, just unzip (or copy) the modified Magic Lantern files on your card and overwrite the old ones.
Désinstaller Magic Lantern
 Don't just delete the Magic Lantern files from the card! If you do, the camera will freeze at startup and you'll have to take the battery out.
Désinstaller ML d'une carte flash
- Format that card from the camera (select this option: Format card, remove Magic Lantern) and reboot. Your camera will load the original firmware when you use that card.
Désinstaller ML de l'appareil photo
- With a Magic Lantern card, launch the Firmware Update process and follow the instructions on-screen.
- Re-installing Canon firmware will not remove Magic Lantern.
Résolution de problèmes
- If the card LED blinks continuously after running Firmware Upgrade, you don't have the right Canon firmware version or sub-version. To fix it, install the official Canon firmware upgrade from these links, even if you already have the correct version number (you may have a different sub-version number).
- If the screen does not turn on, but autofocus works, remove the battery and format the card. This happens when the card is bootable, but autoexec.bin is not there.
- Check if all doors are closed. The camera will not boot if any of the card or battery doors are open !
- If the camera does not boot (seems dead), remove the battery and the card. Then put the battery back and try to boot the camera without card. Then put a formatted card in the camera and try to boot without Magic Lantern. Only after you are sure the camera is OK, you can try to see what's wrong with Magic Lantern.
- If the camera asks for a firmware update, place Canon firmware on the card (this was a problem in older versions).
- DO NOT use a bootable card without a working autoexec.bin on it! If you do, remove the battery immediately, switching the camera off is not enough !!!
- Check the issue tracker for similar problems; if you can't find the solution, create a new issue there.
Notes Importantes
- After opening the card door, always wait for LED confirmation (or for 5 seconds) before removing the card!!! (no such problem on 550D)
- EyeFi cards may not work; you must use plain SD / SDHC / SDXC / CF cards.
- If you have a bootable card and have the
BOOTDISKflag set in the camera (which the installer does), and you do not have anAUTOEXEC.BINfile on the card, the camera WILL NOT BOOT! It will hang and not wake up until the battery is removed. - If you encounter a “locked up” camera, quickly remove the battery.
- When in doubt, remove the battery and reboot.
- And, remember that this software can damage or destroy your camera.