This is an old revision of the document!
Table of Contents
ja:userguide-header&nofooter
Magic Lantern v2.3 - User's Guide 日本語
機能一覧
- オーディオ
- disable AGC 英語OSでの音量オート(Automatic Gain Control)を無効にできる。(すでに殆どのカメラでマニュアル設定可)
- audio meters 音量メータ表示
- manual audio controls マニュアル調整(すでに殆どのカメラでマニュアル設定可)
- input source オーディオの入力選択(内蔵マイク、外部入力)
- audio monitoring A/Vケーブルでオーディオモニタ(対応機器のみ).
- 静止画撮影補助
- zebras 黒とび、白飛びの画面表示
- false color 偽色部分の表示
- histogram ヒストグラム表示
- waveform ウェーブフォームの表示
- spotmeter スポットメータ。部分的な明るさなどの情報表示
- vectorscope ベクタースコープ表示
- フォーカス補助
- focus peaking 合焦した部分を色で表示
- zoom while recording 録画中のズーム
- trap focus フォーカスがあったら撮影
- rack focus フォーカスを少しずつずらして前後すべてでピントの合った画像を数枚撮影できる
- follow focus ボタンでフォーカスを操作
- focus stacking フォーカス位置を始点、終点設定し動画撮影中に移動できる
- 動画撮影補助
- Bitrate control ビットレート調整
- movie logging Exifのような撮影データを動画ファイルと同時にファイルに保存
- auto-restart バッファー書き込みが追いつかなくて停止したり、4Gigのリミットで停止した際に、自動的に録画再開
- HDR video 1フレームごとにISOを明暗しHDR動画の撮影ができる
- advanced FPS control FPSをダイレクトに設定します。
- ライブビュー調整
- contrast コントラスト調整
- saturation サチュレーション調整
- display gain ライブビューの明るさ調整
- Cropmark 画像: ユーザーが定義した画像をオーバレイで表示することで画角調整補助
- 更に細かな調整機能
- ISO ISOを詳細設定
- Shutter シャッターの詳細設定
- Kelvin white balance ホワイトバランスのきめ細かな設定
- image settings 画像設定
- ブラケット
- exposure bracketing きめ細かな設定のできるブラケット
- 外部装置なしの遠隔シャッター
- タイムラプス
- intervalometer (静止画と動画でインターバル撮影
- bulb ramping (マニュアルと自動) インターバル中の明るさ変更を計算して追従
- FPS 低フレームレート動画(最低 0.2 FPS)
- silent pictures シャッターを切らずに静止画撮影
- 天体&夜間撮影
- bulb timer 最大8時間の内蔵バルブ機能
- 情報表示
- focus and DOF info DOF(Depth Of Field)焦点距離、範囲の表示
- CMOS temperature センサーCMOS温度
- shutter count シャッター動作数
- ストロボ補助
- flash exposure compensationrange up to -10 to +3 EV (カメラ依存).
- 省電力
- Turn off display 操作していないときの、ディスプレイOffやバックライトOff
- 便利機能
- 再生中のQuick zoom
- 各機能でのkey shortcuts
- などなど!
重要事項
- SDカードにをブート可能に設定した状態でautoexec.binファイルを削除した場合、カメラはハングアップします。すぐにバッテリーを抜いてください。カメラが壊れる可能性があります。
- もしカメラがハングアップした場合にはすぐにバッテリーを抜いて電源OFFしてください。スイッチをOFFにしても反応しません。
- このソフトは未保証でカメラを壊す可能性があることを忘れないでください。
既知の問題点
- 録画時最初の数秒は音が大きくなることがあります。
- 時々、ラックフォーカスやスタックフォーカスが動作しなくなることがあります。これは仕様ですので、カメラをリブートしてください。
- HDでなくSDのモニタは完全にはサポートされません。(マジックズームやRGBツールの幾つかが動作しません)
- 600D/X5のオーディオ操作は現在開発中です。 オーディオのマニュアル設定(AGC disable)はキャノンメニューから設定してください。
各種機能
ムービーモード
ほとんどのカメラはムービーモード華道家の判定をモードダイヤルで行います。この方法は明確にムービーモードと判断することができます。
しかしながら、幾つかのカメラにおいてそれはムービーモードを判断する材料に使いません。これらのカメラにおいてマジックランタンは以下の設定によって、今がムービーモードであるということを判断します。
- Canon 5D Mark II: ライブビュー中でなおかつ録画が有効で、さらにライブビューがムービーに設定されているとき。Tip:ライブビュータイプはExpoメニューから設定できます。
- Canon 50D: ライブビューでなおかつ録画が有効というのをマジックランタンメニューから設定しているとき。
ムービーモードが有効のとき、マジックランタンは画面下の情報バーに”Mv“を表示します。
The ''Q'' ボタン
ほとんどのカメラは[Q]というボタンがあります。無いカメラでは以下のボタンが代用できます。
- 5D Mark II:
Picture Styleボタン. - 50D:
FUNCボタン. - 500D: LiveView ボタン.
ライブビューのスクリーン
マジックランタンではライブビューの空き部分に様々な情報を表示します。この画像は、一般的なマジックランタン有効時の画面です。
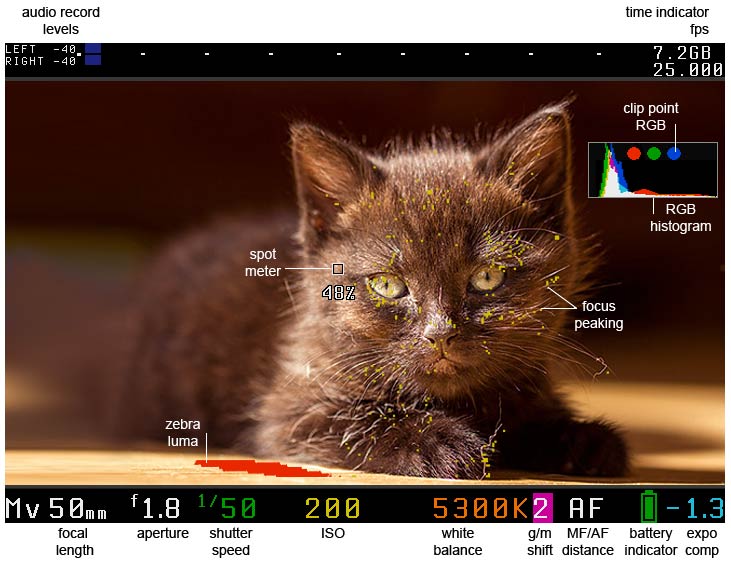
詳細:
- オーディオメーター: オーディオ録音レベルをdBで表示します。バーは黄色で-12dBまで、赤で-3dBまでを意味します。
- FPS: 現在の録画FPS値を表示します。(25.000, 24.000, 23.976 etc).
- シャッタースピード: ムービーモードでは、180度ルールにしたがって色が変化します。緑になる値が現在のFPSに対する180度ルールで計算した適正値です。これから外れると映像がカクカクになったりするので、わかっている場合以外は適正値で利用してください。静止画モードでは、ブレが発生しそうな状態だと赤になります。
- ISO: ISOを表示します。
- ヒストグラム: 明るすぎや、暗すぎの部分を画像にオーバレイする形で表示します。
- Green/magenta ホワイトバランスシフト: 録画時のホワイトバランスをケルビン値だけでなく色で直接設定できます。色かぶりに対応できます。しかし全てのカメラで対応しているわけではありません。
ショートカットキー
再生モードショートカットキー
Q(550D),UNLOCK(60D),DISP(600D),LV(500D),FUNC(50D) orPicture Style(5D Mark II): 露出関連ツールの表示 (ゼブラ、偽色、ヒストグラム、ウェーブフォーム、スポットメーター)とクロップマーク(設定中の Overlay メニューのショートカット).PLAYモード中のSET+Main Dial (スクロールホイール) : 幾つかのカスタムプレビューの実行 (HDRイメージプレビュー, サイレントピクチャ表示, 複合露出, タイムラプス再生, 画像比較). SET+MainDialを見てください.LV: 現在のイメージを半透明にして比較出来るようにします。 (Ghost Image が有効のとき). パノラマとか、同じ柄を撮影するときにブレの確認などに利用できます。LVon 60D/600D: 画像プロテクトへのショートカットです。SET+Erase: 削除の確認なしに画像削除できます。Zoom In: クイックズーム:1度押すだけで予め設定した拡大倍率に一気に拡大します。
十字キーショートカット
十字キーにて以下の設定を素早く変更できます:
- オーディオゲインと入力ソース切り替え
- ISO とケルビンホワイトバランス(一時的なホワイトバランスオートもあります)
- シャッターと露出も数回の手順でできます
- LCD バックライトとサチュレーション、ディスプレイ明るさの変更
どんな設定がしたいかをPrefs配下の Arrow/SET shortcuts のサブメニューから選べます.
ショートカットメニューを有効にするには以下のボタンを押してください。
- 550D:
Avボタン(オプションでLDCセンサーを隠す) - 60D:
Meteringボタン (near ISO) - 600D:
DISPボタン - 500D: LCD センサーを覆う;
- 50D:
FUNCボタン; - 5D Mark II:
Picture Styleボタン.
十字キーはこれ以外にフォーカス移動にも利用できます。 (Follow Focusを参照).
これも見ておいてください Shortcuts article.
その他のショートカット
SET押しながら起動: マジックランタンをロードしない- ライブビューで
INFO/DISP: 有効に設定していたら、現在のdisplay presetを変更します。 - 録画中の
Zoom In:設定してたらー> (Magic Zoom) - ライブビューで
SET: AFエリアをセンターに戻します。 - Activating AF mode dialog when Manual Focus is active will toggle Trap Focus.
マジックランタンメニュー操作
ERASE(ゴミ箱)ボタン でマジックランタンメニューを表示します。- 十字キーや、ジョイスティック、スクロールホイールで操作します。
SETで+方向PLAYでー方向の値操作ができます。Qでサブメニューを表示します。INFOまたはDISPボタン でヘルプを表示します。- ライブビューで
Zoom Inメニューの背景に画像プレビューを表示します。 MENUでアドバンスドメニューモードとシンプルメニューモードを切り替えます。
Qのないカメラ:
- 5D Mark II:
Picture Styleボタン. - 50D:
FUNCボタン. - 500D: LiveView ボタン.
5D Mark II と 50D 用の特別メニュー(optional):
- ジョイスティックのセンターを長押ししたらサブメニューを表示します。
- メニューはスクロールホイールで操作します。
- サブメニューは、ジョイスティックを短い押ししたら消えます。(ジョイスティックの左右で値操作)
- メニューを閉じるのはシャッター半押し
オーディオ
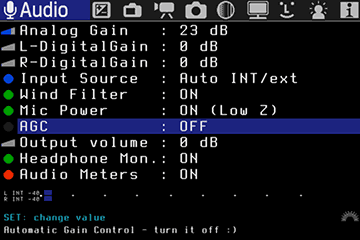
マニュアルオーディオ設定
このメニューは Canon 600D/T3i/X5にはありません.
KissX5のオーディは別チップを使っているため、マジックランタンから操作する機能は現在開発・調査中です。キャノンメニューから基本的な設定が利用できますが、モニタリングはできません。オーディオメータは、録画中のみ動作します。
Audio tests by Ryan Sauve Audio_Conclusions
アナログゲイン (dB)
アナログ入力時のゲインを調整します。バーがグリーンになるように調整しますが、外部アンプなどを利用してできるだけ下げることをおすすめします。
左右別々のデジタル・ゲイン (dB)
デジタル・ゲインは左右別々に調整できます。おすすめは0です。
インプットソース
撮影用の入力:
- 内蔵マイク
- L:内蔵 R:外部
- 外部入力をステレオ
- L:内蔵 R:バランス (左を内部マイク、外部マイクを右に。右はバランスオーディオのようにLRにバランスの2本を入れる。
- オート 内蔵・外部: マイクが刺さっているかどうかで、外部からのステレオを利用するか、内臓のLR同じ物を入力するモノラルを使うかを決定します。
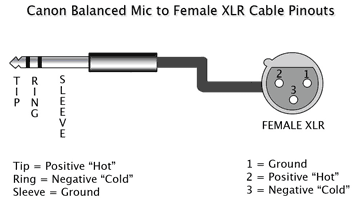
バランスオーディは特別な装置がなくても長いケーブルが利用できます。普通バランスマイクは、XLRコネクタで取り外しも簡単なおかつロックもかかりますし、キャノンのDSLRのミニピンに変換することもできます。バランスのプロ用マイクは簡単にDSLRに取り付けでき、良い音質・S/N比が得られます。 (source)
風フィルタ
デジタルハイパス・フィルタのこと。詳細はこちら AK4646 datasheet p.34.
マイクパワー
これはインターナルマイクと、特定の外部マイク用です。これはインピーダンスを低下させます。詳細はこちら AK4646 datasheet p.31 and the Mic power control thread.
ON: input impedance is 2 kOhm;OFF: input impedance is 30 kOhm.
この設定は、内蔵マイクか、L:内蔵 R:外部がONであれば常にONになる。
AGC(自動設定オーディオ)
英語ファームでは、AGC(Automatic Gain Control)。日本語ではオーディオ設定オートかマニュアルかというやつのこと。オートをON/OFFする機能。
ヘッドフォンモニタリング
Audio monitoring tutorial
A/Vケーブルを利用したヘッドフォンモニタリング。X5では開発・調査中です。
SDモニタを使っているときにはOFFにしてください。!
オーディオモニタリングをするには特殊なケーブルが必要です:
- カメラ添付のA/Vケーブルを3.5mmピンに変換する必要があります。 a RCA - 3.5mm jack adapter
- これらを買うか、半田づけして作ってください。
注意:海外電話のなかでコネクタ形状が一致するものがありますが、それらはつかえません。これを使ってください the original cable which came with your camera.
アウトプットボリューム (dB)
オーディオモニタリング用のデジタルアウトプットゲイン。カメラ内臓のスピーカーには影響を及ぼしません。
良い結果を得るには、抵抗の低いヘッドフォンを利用してください。例えば、 Audio Technica ATH-M50 (38 ohms). 抵抗値の高いヘッドフォンを利用する場合にはリンクのようなヘッドフォンアンプを利用してください FiiO E5.
オーディオメータ
オーディオの入力レベルを表示します。-40dBから0dBの範囲です。-12dbまで黄色。赤は-3dbまでを表します。
オーディオメーターは、ムービーモードでのみ表示します。
露出
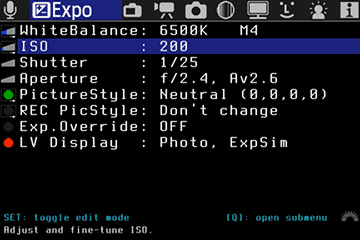
露出関連のパラメーターを調整します。ほとんどはマニュアルモードで動作しますが、いくつかはP,Av,Tvでも動作します。(動画と静止画両方対応)
ホワイトバランス
拡張ホワイトバランスコントロール。方法は、ケルビン値による設定(range: 1500…15000K).
サブメニューで設定できる詳細オプション:
- ケルビンホワイトバランス
- WBShift G/M: Green-Magenta ホワイトバランスシフト。色かぶり対応できます
- WBShift B/A: Blue-Amber ホワイトバランスシフト。 1 ユニットはケルビン軸の5 mireks , 詳細はこちら this post;
- カスタム RGB 倍率: 倍率調整してさらに細かいRGB色を設定
- 黒レベル: このパラメータはRAWデータに影響します。色かぶり調整でうまくいかない場合にはこちらが利用できることがあります。
- Auto adjust Kelvin + G/M: ライブビュー利用時にはマジックランタンが適切な値をライブビューの画像から計算して設定できます。利用するのはセンター部分の2000×2000なので、標準グレーのボードをセンターに置いてください。
ISO
拡張ISOコントロール.
色の意味:
- オレンジ = Canon ISOとMLで調べたネイティブISO値(低ノイズになる)を利用
- グリーン = ISOにデジタル・ゲインを掛けた値(80,90.160,320ー)。これらのISO値では、100,200,400などの標準ISOよりも低ノイズであることがわかっています。
- 赤 = デジタル・ゲインを上げた状態
サブメニューオプション:
- Equivalent ISO 実効ISO;
- Analog ISO アナログISO;
- Canon digital ISO キャノンデジタルISO;
- ML digital ISO (DIGIC) - ムービーモード中では、コレを低く抑えることによりノイズが現象します。しまし、ハイライト部の色が変わってしまう問題もあります。この機能はISO50やISO51200などで発生します。
- Display Gain (night vision) - 静止画モードにて、表示した画像のISOを上げます。これは画面の表示ISO感度だけをあげるので、撮影したものには影響を及ぼしません。
- Highlight Tone Priority (ムービーモードでの明度を1段ひろげることができます。);
- ISO selection (Canon ISOs or ML ISOs) - ムービーでのみ利用できます。;
Shutter
Fine-tune shutter speed.
- In photo mode, Magic Lantern displays shutter values rounded to 2 significant digits (e.g. 1/50 may be displayed by ML as 1/48). This is not a bug.
- In movie mode, shutter values are displayed with 3 decimal places (for example, in PAL mode, Canon uses 1/33.333 to avoid flicker).
- To use shutter speeds normally not available in Canon firmware (like 1/25 or 1/8000 in movie mode), enable exposure override.
Aperture
Adjust aperture. When exposure override is enabled, you can adjust it in 1/8-stop increments.
PictureStyle
Change picture style or adjust its parameters.
REC PicStyle
You can use a different picture style when recording (toggled automagically). May be useful with flat picture styles.
Exp.Override
This mode bypasses Canon exposure limitations (for ISO, Tv, Av). It enables:
- Manual video exposure controls in cameras without it (500D, 50D, 1100D).
- 1/25s in movie mode (24p/25p) → 1/3 stops better in low light.
- 1/8000s in movie mode, useful for slow motion.
- ISO 12800 is allowed in movie mode on 60D and 600D.
- Full-time DOF preview in photo mode, without blocking certain keys.
Settings:
- OFF: Canon default exposure mode.
- ON: ML overrides exposure values (change them from Expo menu).
- Auto: ML enables it only when needed:
- For 500D, 50D, 1100D: in movie mode, to enable manual exposure controls.
- For 60D: in Manual mode with a manual lens, to fix the LiveView underexposure bug.
- For 550D/60D/600D/5D2: when you select a shutter speed, aperture or ISO value which is not available in standard firmware (e.g. 1/25s or 1/8000s in movie mode).
Side effect: in photo mode, anything slower than 1/25 seconds will be underexposed in LiveView.
LV Display
Selects or displays LiveView display type:
- Photo display, with exposure simulation
- Photo display, without exposure simulation (for framing and for flash photography)
- Movie display.
Overlay
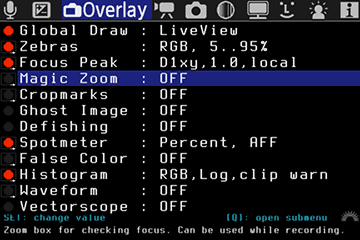
Graphics overlays that can be used in LiveView or in image review mode: histogram, zebras, cropmarks, spotmeter, focus peaking, false color…
Global Draw
Choose when to enable Magic Lantern overlay graphics: (zebra, cropmarks, histograms, audio meters, ML shooting info…):
- in LiveView only
- in QuickReview (photo mode outside LiveView) only
- Both modes
- Disabled
If you used display presets, press Q on this item to switch the presets while you are in ML menu.
Zebras
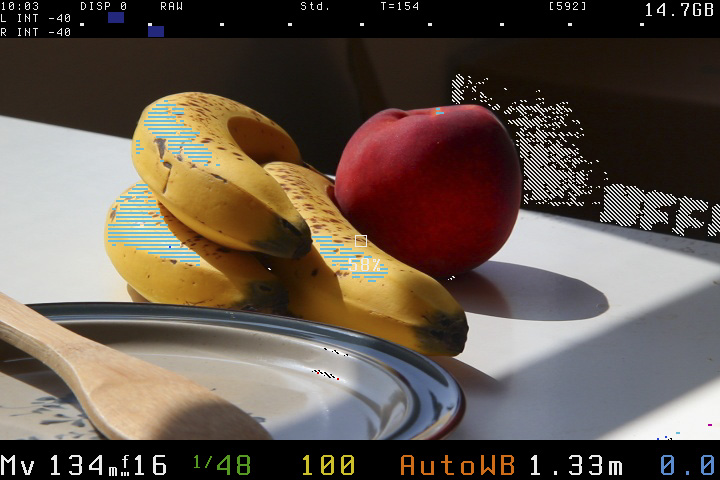
Enable/disable zebra stripes, which indicate overexposed or underexposed areas.
Color spaces:
Luma: zebras are computed from Y channel only.RGB: check overexposure for each RGB channel. Clipped channels are displayed in the opposite color (i.e. clipped red shown as cyan, underexposed as white and so on).
You may adjust thresholds for underexposure and overexposure, or you can disable zebras while recording.
Note: when using the Technicolor CineStyle picture style, luma will have values between 16 and 255; therefore, you will have to set the underexposure threshold to 16 or greater.
Focus Peak
Focus Peaking demo
Focus assist function. High-contrast lines will be marked by blinking dots showing which part of the image is in focus.
Methods:
D1xy: computes first image derivative on X and Y and takes the max value. May work better in low light or on noisy sensors.D2xy: approximates second image derivative with a 3×3 Laplacian kernel. May be more accurate in good light.
Other parameters:
Threshold: how many pixels are considered in focus (percentage).Color: either fixed color, or a color coding according to focus intensity.Grayscale img: if enabled, LiveView will displayed as grayscale (but still recorded as color).
To see how it works, check this article from Luminous Landscape.
Magic Zoom
Magic Zoom demo
Displays a zoom box for focus assist. Can be used while recording.
Trigger modes (not all modes are available on all cameras):
HalfShutter: triggered when you press the shutter ボタン halfway.Focus Ring: triggered by turning the focus ring.Zoom.REC: triggered by pressingZoom Inボタン while recording. If your camera has a LCD sensor, you may also cover it and pressZoom In.FocusR+HalfS: triggered by turning the focus ring, or by pressing shutter halfway.Focus+ZREC: triggered by turning the focus ring, or by pressingZoom Inwhile recording.Zoom In (*): triggered byZoom Inボタン (overrides Canon's default zoom modes). To bypass magic zoom, press both zoom ボタンs at the same time or cover the LCD sensor.Always On: no trigger key needed. You can use both Canon's 5x/10x zoom and Magic Zoom.
When ML believes you have achieved perfect focus, Magic Zoom will display a focus confirmation (customizable):
Green BarsSplit Screen: when the image is out of focus, the zoom box looks like a split focusing screen from old film cameras.Split Screen with ZeroCross: will reverse the split direction whenever you achieve perfect focus.
Other parameters: size, position, magnification.
Notes:
- Focus triggering only works with lenses that report Focus distance, or when you use follow focus / rack focus.
- In some modes, half-pressing the shutter may temporarily hide the zoom overlay.
Original implementation: Magic Circles by AJ.
Cropmarks
Cropmarks or custom grids for framing and composition.

Notes:
- If you use custom cropmarks, place them in
ML/CROPMKSfolder on your SD card and give them short 8.3 names. You can place at most 9 cropmarks on the card. - Get more cropmarks from the ML cropmark repository or draw your own (see Cropmarks).
Cropmarks Tutorial
Ghost image
Shows a transparent overlay which can be created from any image in Play mode.
Usage:
- To select the image, go to Play mode and press the
LiveViewボタン. - Move the ghost image in LiveView with arrow keys; center or hide it with
SETor joystick press.
Defishing
Preview the rectified (defished) image from Samyang 8mm fisheye lens, using rectilinear projection.
This feature works best in photo mode (outside LiveView).
Defishing uses a pre-computed look-up table (LUT). It is possible to create LUT files for any other lens or projection by defishing vram/xy.png with your favorite defishing software, and then running vram/defish-lut.m to get the LUT file. All the required files are found in the ML source tree. Project files (*.PTO) for nona (hugin) are provided for both rectilinear and Panini projections.
Spotmeter
Measure brightness from a small spot in the frame.
Possible measurement units:
- Percent (0..100%)
- Raw 8-bit levels (0..255)
- IRE -1..101 (formula used by AJ, which maps 0-255 luma levels to approx. -1..101 IRE)
- IRE 0..108 (formula proposed by Piers, which maps 16-235 luma levels to 7.5-100 IRE)
- RGB (displays HTML-like color codes)
False color
This is a tool for evaluating the exposure. It shows different luma (Y) levels using a color map. You may select one of the following color maps:

Tips:
- you may configure a display preset with False Color and toggle it with a single ボタン press.
- you may also use false colors to highlight 50% and 70% brightness levels, or to reveal color banding, or to check for uniform green screen lighting.
Histogram and Waveform
Using The Video Histogram To Keep Detail in the Highlights
These exposure tools will show the distribution of image brightness levels.
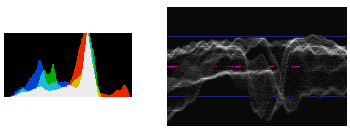
To learn how to read these graphs, see Understanding Histograms and Final Cut Waveform Monitor.
Vectorscope
This tool shows the color distribution with an U-V plot. Useful for color grading.
To learn how to read it, see Introducing Color Scopes: The Vectorscope.
Movie
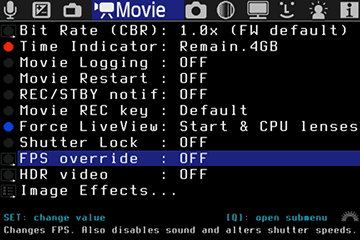
Functions specific to movie mode.
Bit Rate
Controls H.264 bitrate used for video recording.
Possible modes:
CBR: constant bitrate. You specify a factor for multiplying default video bitrate, between 0.1x and 3x. CBR 1x is the firmware default setting.QScale: constant quality, variable bitrate (VBR). Available values: -16 … +16. Lower numbers mean higher bitrates.Firmware default: completely disable bitrate control.
Notes:
- Increasing the bitrate may cause recording to stop. You need a fast card.
- CBR actually works by adjusting QScale on the fly; the instant value is displayed near the recording dot.
- In QScale mode, bitrate is completely out of control (don't use it!).
- In CBR mode, QScale will not go outside [-16…+16]. When QScale reaches the extreme values (-16 or +16), bitrate will be different than your CBR setting. Watch the bitrate indicators. This is not a bug, please do not report it.
- You can push the bitrate higher if you record without sound, then use Audio RemoteShot to sync the video with an external audio track.
- You can't change this setting during recording.
- If buffer usage gets too high, ML will pause all CPU-intensive graphics. Change the
BuffWarnLevelsetting to customize this.
Time Indicator
When recording a movie, ML will display a small time counter in the upper right corner, which can be:
Elapsed: duration of the current clipRemain.Card: estimated amount of recording time remaining on the card.Remain.4GB: estimated amount of recording time until reaching 4GB (or until filling the card, whichever comes first).
Unlike Canon's timer which assumes constant bitrate, ML timer assumes variable bitrate and works even if QScale is enabled. However, due to variations in bitrate, the estimated value will fluctuate a lot, and this is normal.
Movie Logging
If this setting is ON, Magic Lantern will write out a metadata file for the each movie to MVI_1234.LOG (numbered after the movie). The log file contains lens and exposure info, as well as a timestamp every time any of the parameters is changed during recording.
Log files are placed in the same folder as the movies: DCIM/100CANON/, 101CANON etc.
Tip: you can rename LOG files to CSV and import them in MS Excel.
Movie Restart
While this setting is on, movie recording will restart automatically, unless you stop it. There will be a few seconds skipped during restarting.
REC/STBY notify
Custom notifications for recording or standby:
- Red Crossout (highly recommended if you forget to press record)
- Message (it shows
STBYorREC) - Beeps (it will beep when recording starts or stops)
- Blue LED (obvious if your camera has it)
Movie REC key
This option enables you to start/stop movie recording by half-pressing the shutter ボタン.
Tip: with this, you can use a wired remote to start/stop recording.
Force LiveView
Force LiveView in Movie mode (bypass the dialog saying Press LV ボタン to activate movie shooting).
- Always: force LiveView even if you use an unchipped lens, or no lens at all. Be careful, you may get dust on the sensor while changing lenses.
- Start & CPU lenses: it will force LiveView at startup, regardless of the lens used. After this, it will only bypass the dialog when a chipped lens is attached (i.e. it will enter LiveView as soon as you attach a chipped lens).
Shutter Lock
This option locks the shutter value in movie mode (you will be able to change it only from ML menu).
FPS override
This setting alters FPS for all video modes. Only undercranking works well.
FPS is changed by altering two timer values (let's call them Timer A and Timer B). Increasing any of these values results in lower FPS. Aside from FPS, changing these timers may alter shutter speed and rolling shutter.
Options:
- Desired FPS: choose a value from 0.2 fps to 65 fps. If the desired value is not possible, ML will choose the closest safe option (look at 'Actual FPS' below).
- Optimize for:
- Low light: use this option for recording timelapse with shutter speed set to 1/fps (360 degrees); at high FPS values, you may be able to use other shutter speed values.
- Exact FPS: try to achieve an exact FPS value, such as 24.000 or 30.000 or 12.500. If more exact solutions are found, ML will choose the one with lowest jello effect.
- High FPS: changes FPS without altering shutter speed and allows a slight overcranking (60D, 600D).
- LowJello, 180d: try to minimize the jello effect (caused by rolling shutter), while allowing you to expose at 180 degrees (0.5/fps) if possible.
- High Jello: maximize the jello effect and enable fast shutter speeds. You can use this mode for recording slit-scan frames (distorted images like these, which use the extreme jello effect in creative ways).
- Shutter range: displays the available shutter speed range with current settings. When you use FPS override, Canon menu will still display 1/30 … 1/4000, but the actual shutter speed will be different; read it from ML displays. You can alter shutter speed range by changing the ratio between the two timer values (decreasing timer B will result in faster shutter speeds available).
- Timer A: displays the value of timer A and lets you fine-tune it. ML will re-adjust timer B to match your FPS choice.
- Timer B: displays the value of timer B and lets you fine-tune it. ML will not re-adjust timer A, so this option will let you fine-tune the exact FPS value.
- TG Frequency: displays the crystal oscillator frequency of the FPS circuit driver (read-only, depends on your camera).
- Actual FPS: this displays the current FPS, computed as TG_FREQ / timerA / timerB (read-only).
- Sound Record: by default, ML will disable sound recording when FPS override is enabled; otherwise, audio will go out of sync and recording will stop. Only enable sound if you know what you are doing.
Notes and tips:
- This function will not change the frame rate from the video header; the video will playback at the setting from Canon menu.
- Recommended usage: set FPS to a very low value (for example, 3fps) to record a timelapse.
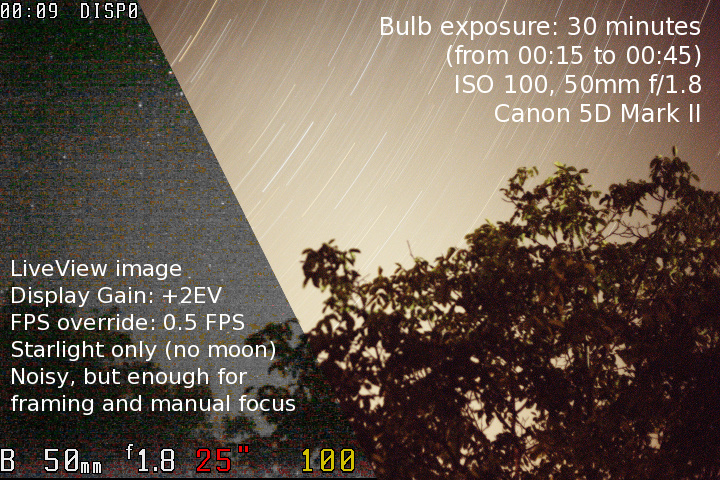
- Tip: this feature also works in photo mode, making LiveView usable in dark environments. Combine it with display gain.
- To get 180-degree shutter speed at very low FPS, simply discard half of the frames in post.
- If 0.2 FPS is not enough, use Frame Merger (a VirtualDub plugin).
- Exact frame rate may be
roundedto be an exact multiple of PAL/NTSC frame rates.- PAL modes: 25p/50p. Rounded frame rates: 33.333fps, 12.5fps, 11.111fps and so on.
- NTSC modes: 30p/60p/24p. Rounded frame rates: 29.97fps, 23.976fps, 11.988fps and so on.
- For fine-tuning and calibrating custom frame rates, use EOSTimerGen.
HDR video
Magic Lantern HDR Video
This feature allows you to shoot a high dynamic range video by alternating ISO every other frame. Select the two ISO values from the submenu.
Possible postprocessing workflows:
- Interframe script: user-friendly version and bare-bone version;
- GingerHDR (plugin for Adobe After Effects and Premiere)
- etc (please help me filling the list!)
Image Effects
Custom image effects found by investigating DIGIC registers:
- Desaturate (lets you record grayscale with any picture style);
- Negative image;
- Swap U-V (red becomes blue);
- Cartoon look (for this to work, set sharpness in your picture style to any nonzero value).
Movie Record (50D)
Enable movie recording on 50D (1920×1080, 30fps, without sound). To start recording, go to LiveView (P/Tv/Av/M) and press SET.
WARNING: Canon 50D was NOT designed to record movies. Keep in mind:
- This feature was not thoroughly tested by Canon and may be unstable (even if you record without ML).
- Always disable movie recording when you don't use it.
- Battery will drain quickly when recording; also, the camera may overheat.
Limitations:
- The camera will not record sound. You can use an external recorder (for example, Zoom H1, H2 or H4n) and sync the sound in post with a clapperboard.
- You can't play back movies in the camera.
This setting remains active even if you start the camera with standard firmware (until you clear your settings).
Shutter ボタン (50D)
Leave unchanged: obvious :)Block during REC: blocks the shutter and related (AF,*) ボタンs while recording. In 50D, taking pictures while recording would result in ERR99; with this option, you can avoid taking pictures while recording by mistake. Side effect: this will disable image stabilization during recording.Hold during REC (IS): ML will keep the shutter ボタン pressed half-way during recording, which will enable image stabilization (IS). Side effect: you need to press the shutter ボタン half way to turn IS off before the camera will let you stop recording.
Exposure Lock (50D)
Locks the exposure in movie mode. You can also use the * ボタン (you don't have to hold it pressed).
Shoot
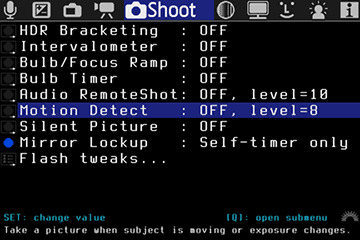
Functions for stills shooting (some of them work for movies, too).
HDR Bracketing
Exposure bracketing for HDR images and timelapses.
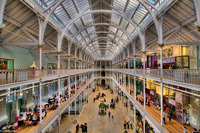
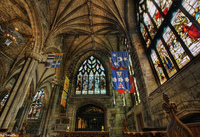

- In
Mmode, this function does shutter and/or ISO bracketing. In the other modes it does exposure compensation bracketing. - To start bracketing, take only the first picture and ML will continue the sequence.
- To preview HDR images in camera, set SET+MainDial: ExposureFusion from Prefs menu, Image review settings, then go to playback mode, hold
SETand turn the main dial (wheel). - For each HDR picture set, Magic Lantern may also write a bash script for stacking the exposures with enfuse (version 4.x), with optional alignment (align_image_stack). More info: Exposure Fusion: What is it? How does it Compare to HDR? How Do I Do It?.
Intervalometer
18853423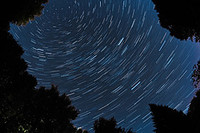 19854305
Take pictures or movies at fixed intervals.
You can stop the intervalometer by rotating the mode dial, by pressing MENU or PLAY, or by turning off the camera.
Settings (in submenu):
- Duration between two shots.
- Start delay (up to 8 hours).
- Stop after X pictures.
- In movie mode only: duration of a movie clip.
Tips:
- To avoid flicker, shoot in manual mode, use manual white balance, avoid short exposure times and use a manual lens (if you use an EF lens, lock the aperture and unscrew it).
- To make a timelapse without increasing shutter count, do not use the intervalometer; instead, set FPS override to a very low value (for example, 3fps) and start recording.
- When using the intervalometer in LiveView with
noisymode, your shutter will wear twice as fast than outside LiveView. - If the intervalometer can't be stopped (it may happen in
crazymode), turn the camera off or open the card door.
Power Saving:
- When not in LiveView, press
DISPorINFOto turn the display off. - In LiveView, ML will turn the display and the sensor off during idle times if you enable this option from
Powersavemenu. - While the intervalometer is running, the card led will blink once per second to let you know it's alive and kicking.
Bulb/Focus Ramping
29923391
Bulb Ramping allows the capture of a timelapse that gradually changes exposure, compensating for the transition from day to night.
Options:
- Auto exposure ramping: this option will adjust shutter and ISO automatically, by looking at image brightness of previous shots.
- Manual exposure ramping: this option will adjust shutter and ISO to follow a fixed exposure ramp (a fixed amount of EV change per shot). Can be used as standalone or combined with auto ramping.
- Manual focus ramping: this lets you adjust focus gradually while shooting the timelapse. It requires a lens with autofocus and it can only work in LiveView.
Settings for auto ramping:
- Mode: sunset / sunrise / auto. In sunset mode, the exposure will always increase. In sunrise mode, the exposure will always decrease. This idea was suggested by Tom Lowe on RedUser.net forum.
- Maximum ramping speed: this parameter is used for computing the optimal smoothness factor. A lower value will reduce flicker, but if the value is twice as low as the real rate of brightness change, ML will lose the ability to ramp correctly. For example, if you set a maximum ramping speed of 0.1 EV / shot, and the scene requires a ramping of 0.2 EV / shot, ML will start flickering heavily.
Quick start guide for auto ramping:
1. Take a picture of your scene. You will use it to say: I want my timelapse to be exposed like this picture.
2. Enable Bulb Ramping and Intervalometer.
3. Leave the camera still while ML runs a calibration step:
- Make sure you have a static and well-lit scene (any static scene which does not require long exposure should be fine).
- After calibration, you should get a nice S-curve on the screen.
4. Now you will have to say what tone range to meter for (i.e. highlights, midtones…). Follow the wizard:
- Use arrow keys to select your reference picture (which you just took).
- Use the main dial to select the tone range to meter for. You can't perfectly match two images just by varying one parameter (exposure), so you have to choose what's important for you in this picture.
- For lowest flicker, meter for midtones (choose the 50th percentile, i.e. median, because it's a robust estimation, unlike simple averaging). Leave some headroom for highlights (underexpose a bit).
- If highlights are important, meter for them (choose 80th percentile for example). You will have to shoot RAW and remove flicker when you develop the RAW files.
- The algorithm works best when brightness is close to 50% (try not to choose extreme values for it).
- When you are ready to start, press
SET.
5. Sit back and relax :)
Limits:
- ISO is chosen between 100 and maximum auto ISO value from Canon menu.
- Shutter speed is chosen between 1/8000 (lower limit) and the delay between two shots minus two seconds (upper limit). Example: for 10-second intervals, shutter speed will be between 1/8000 and 8 seconds.
- Aperture is fixed (you can change it manually).
Tips:
- Don't adjust ISO and shutter before the timelapse, they are fully automatic.
- Use a ND filter to reduce flicker during daylight.
- Reduce flicker in post. We recommend VirtualDub with MSU Deflicker plugin (free, works with Windows and Wine). See also Timelapse workflow using free software tutorial.
Technical notes:
- Exposure is metered using a condition like this (for example): 70% of pixels should be below 50% brightness.
- Exposure for every shot is computed from previous shots, using a feedback controller algorithm with a smoothing factor.
- ISO is chosen using the 180 degree rule, so the resulting shutter speed stays between 90 and 270 degrees (that is, between 1/4 and 3/4 of the delay between two shots).
- Only full-stop ISOs (100, 200, 400 etc) are used (because you are supposed to shoot RAW).
- Shutter speed can be adjusted with a resolution of 10ms.
- Frames with fast shutter speeds (less than 1 second in Rebel cameras, less 0.1 seconds in 60D) are taken in Manual mode. You will get flicker.
- It can go from 1/8000s @ ISO 100 (daylight) to several minutes of exposure time @ ISO 6400 (complete darkness).
- Exposure algorithm is a feedback controller designed with pole placement - the closed loop response will have two real poles placed at the smoothing factor value. Smoothing factor is computed in such a way that, when scene ramping speed matches the speed selected in menu, ramp is followed at exactly 1 EV behind it.
- If the lighting changes suddenly a few stops between two shots (for example, you change the ND filters or the aperture), the algorithm should recover completely after 2 or 3 shots. A sudden exposure change is considered when the exposure difference is greater than 2 stops.
Logging:
- When you use bulb ramping, Magic Lantern will save a log file with the exposure parameters, metered values and so on. Please send this file to developers.
- These log files can be used to see how well the ramping went and to fine-tune the algorithm.
Bulb Timer
Very long exposures with Bulb mode and ML timer. This feature is useful for night shots and astrophotography.
Bulb timer is started by holdin the shutter pressed halfway for one second, or by remote triggers / intervalometer.
Tip: you can cancel the exposure earlier by half-pressing the shutter ボタン.
LCDsensor Remote
Start/stop remote shutter release mode with the LCD sensor.
- ? Near: To take a picture, put your hand near the LCD sensor.
- ? Away: Picture is taken when you get your hand away from the sensor. You may combine this setting with Mirror Lockup.
- ? Wave: Picture is taken after you wave your hand 3 times near the sensor. You can leave it on without interfering (too much) with normal shooting.
This feature is useful for avoiding camera shake.
In Movie mode, the Wave ? setting is able to start and stop recording movies. The other modes can only start recording (because it's too easy to stop recording by mistake).
While recording, the Near and Away modes can trigger the rack focus operation.
Audio RemoteShot
Start/stop remote audio trigger. To take a picture (or start recording a movie), make some loud noise, for example, clap your hands or pop a balloon.
Tip: with the audio trigger you can sync a video recorded without sound with an external audio track (see this topic)
Be careful: this may trigger the shutter from the sounds made by camera (like focus beep or noise from operating the ボタンs).
Motion Detect
Motion detection in LiveView.
Trigger modes:
Exposure change: it only reacts to brightness changes. Detects large moving subjects which cause significant change in exposure.Frame difference: it computes the difference between last two frames A and B (luma channel only); this detects smaller movements which do not change exposure.
Detection time is somewhere between 200 and 300 ms according to DataGhost's speed test; it's faster with silent pictures.
Silent Pictures
18835420
This feature is reserved to very advanced users. It can take pictures in LiveView mode without moving the mirror. When enabled, it saves uncompressed YUV422 frames from the LiveView image buffer when you press the shutter halfway.
- Make sure you don't have autofocus assigned to half-shutter press (put it on
*or turn it off)
Modes:
Silent Picture: simple, low-resolution. Image resolution is usually around 1 or 2 MPix, and depends on the current mode (zoom or not, recording or not, and movie resolution). For almost-FullHD resolution (1720×974), chooseFullHDto record a dummy movie.Silent Pic Hi-Res: emulates high-resolution by taking a matrix of small silent pics, in zoomx5mode. You need to have the camera on a tripod and the subject should be static (a picture is taken in a few seconds). Could be useful for focus stacking or for timelapse without increasing shutter count.
Silent picture setting is applied to intervalometer and remote triggers. It will also go to LiveView when you press the shutter half-way. Therefore, you should only enable this setting when you actually use it.
Images are saved in DCIM/1xxCANON/ after the following rules:
- If intervalometer is
OFF, silent pics are named after last picture/movie taken without this function (e.g.12340001.422). You are limited to 10000 silent pictures for eachnoisypicture. - If intervalometer is
ON, silent pics have names like12345678.422. Tip: useFile Numbering → Manual Resetfrom Canon menu to increase folder number (to sort them easier).
To convert a 422 image to JPEG on the PC, use one of the following programs:
- 422-jpg.py (command-line tool, runs on all platforms, you need to install Python, PIL and numpy).
- 422toimage (Windows only, source code available).
- YUV422 Convertor (Windows only, closed source).
Mirror Lockup
Mirror lockup. See Canon user guide for details.
Timer+Remote will auto-enable MLU under one of the following conditions (and disable it otherwise):
- self-timer mode is on (either 2 second or 10 second, but not continuous)
- LCDsensor Remote is in
Awaymode.
Flash tweaks
A few tweaks for flash users:
- Flash expo compensation (-10..+3 EV). Tip: you may use -10EV to trigger an external flash without putting light on the scene coming from the onboard flash.
- Flash / No flash: use this when you are not sure whether to use flash or not. Odd pictures (by file number) will be taken with flash, even pictures without flash.
- 3rd party flash in LV: a trick for using a non-Canon flash in LiveView on Rebel cameras, which disables LiveView on half-shutter press. DISABLE this option when you don't use it!!!
Focus
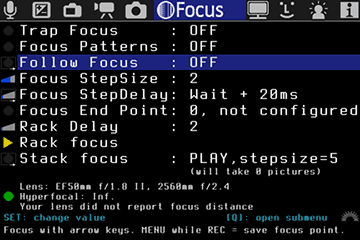
Trap Focus
For MF users: takes a picture when the subject comes into focus.
Modes:
- Hold AF ボタン: you need to hold the autofocus ボタン (half-shutter,
*orAF-ON, depending on your settings). - Continuous: you don't need to hold any ボタン; ML will
holdthe half-shutter pressed for you. This will also block most ボタンs; press the shutter halfway to unlock them for two seconds.
Notes:
- Outside LiveView, it only works with lenses with chip.
- In LiveView it only works for photos, and it will take a picture when the focus indicator has (almost) maximum value on the focus graph.
Notes for LiveView trap focus:
- You may have to turn the lens back and forth a few times in order to let ML compute the correct focus scaling factor for the current scene.
- If you move from a high-contrast scene to a low-contrast one, you will also have to wait a bit until the high-contrast data disappears from the focus graph.
- Press
SETto temporarily disable automatic scaling of focus magnitude.
Focus Patterns
Custom focus patterns which can be used either with autofocus or trap focus.
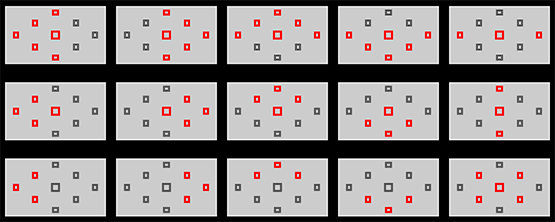
To change the focus pattern:
- Set your camera in photo mode, non-LiveView;
- Look through the viewfinder and make sure the main display is off;
- Change the focus pattern with the arrow keys and
SET; you may or may not receive visual feedback. - Press the
Zoom Inボタン twice to see the current selection.
You can use the custom focus patterns in LiveView Quick Focus mode, too, but the pattern won't be displayed on the screen.
This feature was ported from 400plus.
Follow Focus
Very simple follow focus (like a rack focus controlled manually).
Arrows: you will be able to focus with the arrow keys.LCD Sensor: on 550D/500D, focus by placing your hand near the LCD sensor (avoiding shake). To use this, you may need to disable LCDsensor Remote.
Recommended focus step settings:
- Focus StepSize: 1 or 2
- Focus StepDelay: small values, without
Waitflag. - If the motion is not smooth, try larger delays (100ms)
Quick rack focus while recording:
- Press
MENUto save current focus point (this meansI want to return here); - Use follow focus to change focus point (focus somewhere else);
- Press
PLAYto go to saved focus point; - Press
PLAYagain to go back.
Focus StepSize
Step size for one focus command, as used by EOS Utility.
Focus StepDelay
Delay between two successive focus commands, with an optional waiting flag.
- If
Waitis not active, ML will only wait a for fixed delay before sending next focus command. This will reduce stutter, but may affect rack focus accuracy. This setting is recommended if you only use follow focus. - If
Waitis active, ML will wait until each focus command is completed, and then it will wait for a fixed delay, as configured here. This will increase rack focus accuracy, but may cause stutter with certain lenses.
Focus End Point
This is end point of rack focus (X focus steps from the start point, i.e. from current focus point).
First you have to set the end point. Focus the lens, then press SET on this menu item.
After pressing SET, ML will display Focus End Point: 0 steps from here.. This means the end point is now assigned to current focus position.
At this point, you will see the LiveView image and set the start point using left and right keys (just like with follow focus) or the main dial (scrollwheel). The start point will be always the current focus point (which you are changing); the end point will remain fixed.
Rack Delay
Sets the number of seconds before starting a rack focus. This lets you film the start point first, then initialise the rack focus without touching the camera.
Rack Focus
Triggers the rack focus operation that moves between the start and end focus points. After the move is complete pressing again reverses the move.
SET: rack focus will start after 2 seconds;Q: rack focus will start immediately;PLAY: ML will automatically record a short clip with the rack focus operation.
Step-by-step:
- Pick the end point of rack focus by focusing on it (manually or with AF).
- Configure focus parameters (step size and delay). Different lenses may require different parameters.
- Open the
Focusmenu, go toFocus End Pointand pressSetto zero it out. - Pick the start point by focusing on it with the
LEFT/RIGHTボタンs while the Focus menu is active. Make sure the number fromFocus End Pointis changing as you focus. Fine-tune the position with scrollwheel. - Go to
Rack Focusand pressSETorPLAYto start rack focus. - To return to the starting point, run rack focus again.
Tip: when LCDsensor Remote is set on Near or Away, you can trigger rack focus from the LCD sensor, avoiding camera shake.
Recommended focus step settings:
- Focus StepSize: 1 or 2
- Focus StepDelay: - without
Waitflag: large delays (around 100 ms) ⇒ will ignore small position errors - withWaitflag: small delays (only lens is in very good mechanical condition)
Stack focus
5879032?
This selection will shoot a series of photographs with varying focus points. It is used in macro photography to assemble sharper final images by merging photos where each has a different focus point.
This function can also create scripts named like named FST_1234.SH, which can be used for stacking the images with enfuse. See Exposure bracketing for details on how to use these scripts, and the focus stacking section from Enfuse reference manual. To enable (or disable) the post-processing scripts, go to HDR bracketing submenu.
Usage:
- Configure rack focus and use it to preview the focus range.
- Select the number of focus steps to skip. This will determine the number of pictures to be taken.
- Press PLAY to start the focus sequence (
PLAYmode) or take the first picture (SNAPmode).
You can also combine this function with HDR bracketing and silent pictures.
Recommended focus step settings: same as for rack focus.
The following items are display only:
Focus Dist
The distance to the focal point. Value is returned by most newer Canon lenses. If the lens does not report any distance information, 0 will be displayed and the DOF calculations will not be correct.
See also Focus distance.
Hyperfocal
The hyperfocal distance is the point of focus where everything from half that distance to infinity falls within the depth of field. This is the largest depth of field possible for the current f-number.
DOF Near
The nearest distance in which objects appear in focus.
DOF Far
The farthest distance in which objects appear in focus.
Display
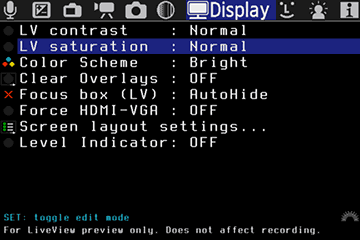
Options for display (most of them are for LiveView).
LV contrast
Adjusts the contrast in LiveView. It doesn't affect recording. This helps when focusing with very flat picture styles.
Values: Normal (no effect), High, Very high, Zero, Very low, Low.
LV saturation
Adjusts the saturation in LiveView. It doesn't affect recording. This helps you focus without being distracted by color.
Values: Normal (no effect), High, Very high, Zero (grayscale).
LV display gain
Photo mode only: this feature increases the brightness in LiveView, making it usable in very dark scenes (where Canon's LiveView would be pitch black). Combine this with FPS override for better low-light performance.
For movie mode, use ML digital ISOs for a similar effect.
Color Scheme
This affects the colors and brightness of the on-screen information (including LiveView overlays, Canon menus and ML menus). Range from: Bright (default), Dark, Bright Gray, Dark Gray, Dark Red. Tip: dark themes may reduce the eye strain during night shooting.
Clear Overlays
Clear bitmap overlays from LiveView display.
HalfShutter: Hold the shutter half-pressed, or the*ボタン, or DOF preview for around 1 second to clear all the overlays from the Live View display (audio, zebra, crops, shutter speeds…).Tip: assign autofocus to*ボタン (from Custom Functions, setShutter/AE lock ボタン=AE lock/AF).WhenIdle: In this mode, all the overlays are erased from the screen (100% clean display) when the camera is idle (i.e. you don't press any ボタンs).Always: In this mode, all the overlays are erased from the screen; you will have to change shooting settings blindly. You can still use the menus.Tip: this feature may be useful with External Recorders, since it removes the focus box and other graphics from the display.
Focus box (LV)
With this setting you can choose to show the Focus box in liveview or hide it when not needed.
Force HDMI-VGA
This option will force a low-resolution mode on HDMI displays (720×480), which avoids black screen when you start/stop recording.
Screen layout settings...
Screen orientation, positioning fine tuning, adjustments for external monitors…
Screen Layout
Choose screen layout (position of ML top and bottom bars), for different cameras or for external monitors.
Top/bottom layouts:
- Inside 3:2: default layout for 3:2-screen cameras (550D and newer).
- Inside 16:10: for 16:10 HDMI monitors.
- Inside 16:9: for 16:9 HDMI monitors.
- 4:3 movie (for 5D Mark II, 500D and 50D in movie mode).
Bottom-only layouts:
- Under 3:2: useful for 4:3-screen cameras (500D, 50D, 5D Mark 2) in photo mode.
- Under 16:9: suitable for low-resolution external monitors and for 4:3-screen cameras in movie mode.
Image position
This may make the image better visible from different angles (especially on cameras without flip-out screen).
UpsideDown mode
Auto Mirroring
For cameras with flip-out LCD, this options prevents mirroring the display when you open it at 180 degrees.
Display: Normal/Reverse/Mirror
For cameras with flip-out LCD, you may select a different flipping/mirroring option.
Level Indicator (60D)
Shows if the picture levels with the horizon. Can be used while recording.
Kill Canon GUI
For 50D only: disable Canon graphics elements to avoid conflicts with ML graphics in LiveView.
Idle/Menus: only enable Canon graphics when some transparent menu from LiveView is active.Idle/Menus+Keys: only enable Canon graphics when you press some keys or navigate the transparent menus from LiveView.
Prefs
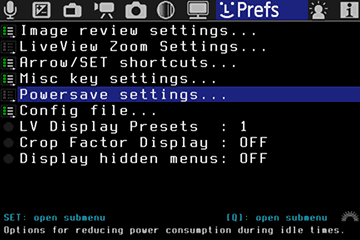
Image review settings...
Customize the image review (playback) mode:
SET+MainDial
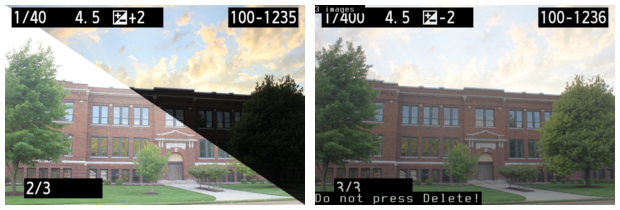
When you hold SET pressed and turn the main dial (scrollwheel), ML may perform one of these functions:
Play 422: display silent pictures fromDCIM/100CANON(low-res only).Exposure Fusion: combine two or more images, useful for previewing HDR images or multiple exposures.Compare Images: compare two images with a diagonal split view. The current image will always end up in the top half.Timelapse Play: scroll through all your pictures quickly.
Image review
QuickReview default: just like in standard firmware.CanonMnu:Hold→PLAY: if you setImage Review: Holdin Canon menu, it will go toPLAYmode instead. This allows you to zoom in as soon as you take the picture (without having to pressPLAY). Credits goto Ken Rockwell for suggesting this.
Quick Zoom
Faster zoom in PLAY mode, for checking critical focus:
- OFF
- ON - zooms faster than Canon firmware.
- SinglePress → 100%: a single press of
Zoom Inwill zoom all the way in (to 100%) - on center point. Next press will zoom out (full screen image). - Full zoom on AF point: similar, but it will zoom on currently selected autofocus point.
- Full zoom on last position: similar, but it will remember the last position of the zoom box.
LV ボタン
Customize the LiveView ボタン in PLAY mode:
- Default (enter LiveView)
- Protect image
Quick Erase
Shortcut for erasing images without confirmation (hold SET and press ERASE). Be careful!
Arrow/SET shortcuts...
Select the features you want to adjust quickly with arrow keys: * Audio gain * ISO/Kelvin * Shutter/Aperture * LCD Brightness/Saturation
You can also enable quick functions for the SET ボタン, coupled with the corresponding arrow adjustments:
- Audio input (internal mic, external mic, balanced…)
- Push-ボタン white balance
- 180-degree shutter speed
- Reset LCD brightness to 5 and saturation to Normal.
Misc key settings...
LCD Sensor Shortcuts
Use the LCD face sensor as an extra key in ML (e.g. for triggering arrow keys, for blocking follow focus or for bypassing magic zoom key).
To fully disable the LCD sensor in Magic Lantern, disable LCD auto off from Canon menu (Wrench 1). You need to do this if you are using a device which covers the LCD sensor (e.g. a loupe).
Sticky DOF Preview
This will make the DOF preview ボタン sticky (so you no longer have to hold it pressed).
Note: enabling DOF preview will block certain ボタンs.
Tip: enable Exposure Override to preview DOF without blocking the ボタンs.
Sticky HalfShutter
This will make the half-shutter press sticky (so you no longer have to hold it pressed).
Tip: use this to prevent the camera from turning off LiveView after 30 minutes.
Swap MENU <-> ERASE (60D)
Swaps MENU and ERASE ボタンs. This feature allows one-handed navigation in ML menu on 60D, but will have to use MENU ボタン to delete the pictures.
DigitalZoom Shortcut (600D)
On 600D/T3i, this lets you customize the behavior of DISP + Zoom In / Zoom Out shortcut key in movie mode:
1x,3x: toggle between 1x and 3x digital zoom modes (FullHD)3x…10x: default Canon setting (change digital zoom value between 3x and 10x).
Note: by default, Magic Lantern disables digital zoom values greater than 3x in order to avoid image quality degradation.
Auto BurstPicQuality
When enabled, it will temporarily reduce picture quality in burst mode in order to maintain a decent frame rate even when the buffer becomes almost full.
This function will reduce picture quality if the buffer has space for less than 4 pictures:
RAW+JPG→JPG Large Fine→JPG Medium FineRAW→JPG Large Fine→JPG Medium FineJPG Large Coarse→JPG Medium Coarse
Possible results (550D, Transcend Class 10, your mileage may vary):
RAW+JPG,JPG-L, all othersJPG-MRAW,RAW, all othersJPG-M
Powersave in LiveView...
Options for maximizing battery life when using LiveView.
- Enable power saving: on Standby, during Recording, or always.
- Use LCD sensor: you can use it to wake up from powersave (wave your hand near it), or to force powersave mode (cover the sensor for a few seconds).
- Dim display: In LiveView, if the camera is idle, Magic Lantern will reduce the LCD backlight level to minimum in order to save power.
- Turn off LCD and LV: this will turn off the display and the sensor activity in LiveView. Mirror will not be moved. If the camera is recording or motion detection is enabled, only the display will be turned off (so recording will not stop).
- Turn off GlobalDraw: if the camera is idle, ML overlay graphics will be disabled to reduce CPU usage.
Config file...
Magic Lantern saves its settings in a configuration file named MAGIC.CFG, located under ML/SETTINGS directory on your card. This submenu lets you customize how these settings are saved.
- Config Autosave: If enabled, settings are saved automatically to
magic.cfgwhenever you change a setting in ML menu. Config saving process will take place as soon as you close the menu. - Save config now: Save ML settings to
ML/SETTINGS/MAGIC.CFG. - Delete config file: use this to restore ML default settings. After deleting the config file, restart the camera.
LV Display Presets
This feature lets you use up to 4 display presets for the settings in the Overlay menu.
On the top bar, you will see DISP 0, 1, 2 or 3. Each of those is a preset for the settings in Overlay menu. So you can, for example, configure DISP 1 with false colors, DISP 2 with zebras and focus peaking, and DISP 3 with clear display.
This menu item sets the maximum number of available DISP presets. To disable this feature, set the number of presets to 1.
To change the current display preset, press INFO/DISP in LiveView, or [Q] on the GlobalDraw entry in the Overlay menu.
Crop Factor Display
If enabled, ML bottom bar will display the 35mm equivalent focal length, including crop factor (1.6x).
For example, a 50mm lens at f1.8 will be displayed as:
50mm f/1.8with this option disabled;80eq f/1.8with this option enabled.
Display hidden menus
To reduce menu clutter, Magic Lantern allows you to hide unused menu items. Enable this to display the hidden items, so you can re-enable them.
Debug
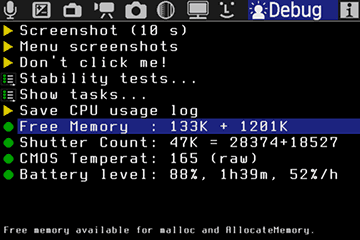
Functions for troubleshooting, development, and possibly unstable features.
Screenshot (10 s)
Print screen after 10 seconds. This option saves a BMP file for the overlays and a 422 file (silent picture) for the LiveView image. The BMP does not contain transparency data. You can combine the two files in GIMP or other image editing programs.
The card LED will blink every second, until the screenshot is taken.
Menu screenshots
Create screenshots of all main menus at once.
Don't click me!
Don't click it :)
Stability tests
This option runs various tests to make sure Magic Lantern is stable and will not crash. You can use it to test your particular configuration.
If it crashes, report an issue.
Show tasks...
Displays the tasks started by Canon and Magic Lantern.
Save CPU usage log
Saves a log with the CPU usage for all tasks.
Free Memory
Displays the amount of available RAM.
Shutter Count
Displays the number of shutter actuations.
CMOS temperature
Displays the internal CMOS temperature, in raw units.
Battery remaining
60D and 5D Mark II only: displays battery percentage, estimated time remaining and battery discharging rate.
For accurate readings, wait until the percentage indicator decreases by at least 2% since powering on.

