This is an old revision of the document!
−Table of Contents
![]() :install-lang&nofooter
:install-lang&nofooter
Guida Installazione | Guida Utente | Domande Frequenti
Magic Lantern v2.3 - Install Guide
Questa guida è valida solo per la versione 2.3. Versioni beta e nightly builds non sono supportate. Consigliamo caldamente di usare esclusivamente versioni ufficiali di Magic Lantern, testate a fondo ed affidabili.
Prima di installare Magic Lantern, è necessario:
- Saper usare un computer (come scaricare un file, come decomprimere un arhivio zip, come aprire un documento PDF…)
- Si consiglia di usare la fotocamera per alcuni mesi. Then you know how to operate it properly and know your way around the different functions. Then take the next step and consider installing Magic Lantern.
- Do your research. There is a lot of information available on this site. Read the user guide and the FAQ, explore the in-depth articles and the documentation section.
- Be patient. Magic Lantern can overwhelm with the amount of functions added. But it is actually very easy to use once you know the basics.
Molto Importante
- Magic Lantern v2.3 usa una leggermente diversa struttura per file e cartelle rispetto alle versioni precedenti (i file dei dati di ML sono stati mossi nella cartella ML)Per questo motivo, raccomandiamo di formattare la scheda ed effettuare un installazione da zero.
- After opening the card door, always wait for LED confirmation (or for 5 seconds) before removing the card!!! During that period, Canon firmware accesses the card without turning on the LED, and if you remove the card too early, the camera will freeze and will drain the battery. Exception: 550D users don't have to wait.
Get the right camera firmware version
 Firmware updates in general can damage your camera. Read the section in your camera manual before updating your firmware. If you are not comfortable with the risks, stop reading and delete the software before you are tempted to try running it on your camera.
Magic Lantern v2.3 funziona solo con le seguenti versioni firmware della fotocamera:
:install-firmware-links&nofooter
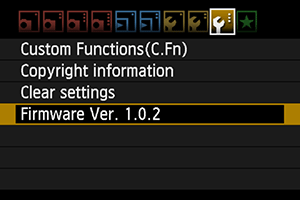
E' possibile verificare la versione del firmware impostando la modalità Manuale (M) per poi vederlo nel menu Canon.
Nothing bad will happen if you try to run ML on a different firmware version - the card LED will start blinking and you'll have to take the battery out. Magic Lantern checks firmware version before attempting to run.
First install guide
Step 1. Preparazione fotocamera
- Ricarica la batteria finché piena
- Rimuovi ogni eventuale accessorio dalla fotocamera (ad esempio pacco batterie aggiuntivo, flash esterno ecc.)
- Assicurati di avere una scheda SD/SDHC/CF per la prima installazione (32 GB o meno). 64GB o maggiori non funzionano per la prima installazione (ma potrete comunque usarle con ML, vedi più avanti).
- Assicurati di avere un lettore schede.
- Ricontrolla che la versione del firmware Canon sia supportata.
- Posizionate la rotellina in posizione Manuale (M).
- Raccomandato: Ripristinate le impostazioni di fabbrica della camera (
cancella impostazioni camera, dal menuchiave inglese 3, vedi immagine). Ricorda questo cancellerà tutte le impostazioni canon e cancellerà eventuali picture style aggiuntivi!
Step 2. Installazione
- Formattare la scheda SD dalla fotocamera (basso livello, dal menu
chiave inglese 1). - Decomprimere tutti i file dall'archivio Magic Lantern zip sulla scheda SD.
- Avviare il processo di Aggiornamento Firmware. Per questo, avviare la fotocamera e selezionare firmware 1.xx ver dal menu
chiave inglese 3.- Se il LED della scheda lampeggià per più di alcuni secondi, aggiornate il vostro firmware Canon dai link qui sotto (anche se havete già il corretto numero di versione firmware!) e riprovate.
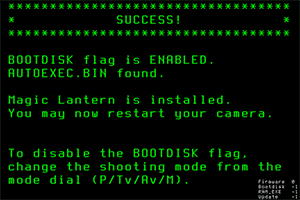
- Una volta visualizzata la schermata verde di conferma, riavviare la macchina fotografica. Fatto.
- Se qvete problemi, controllate la sezione Troubleshooting.
Step 3. Primo avvio di Magic Lantern
- Reimpostate le vostre preferenze dal menu Canon. Aggiungendo le seguenti:
- Con 550D/60D/600D, abilitate esposizione video manuale.
- con 5D Mark II e 50D, abilitate scatto in LiveView.
- Eventualmente reinstallare picture styles aggiuntivi.
- In LiveView, premete il pulsante INFO/DISP ripetutamente fino a visualizzare la barra di Magic Lantern.
- Premere il tasto CESTINO per aprire il menu di ML e LEGGERE IL TESTO DI AIUTO che appare.
- Leggete la Guida Utente e cominciate ad usare Magic Lantern.
- Non dimenticate di attendere per la conferma LED prima di rimuovere la scheda!
Installing Magic Lantern on other cards
- If you use SD/SDHC/CF cards, you may simply repeat Step 2 on every card you would like to use Magic Lantern.
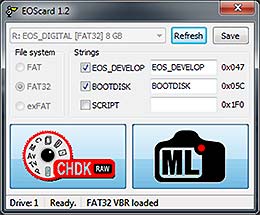
- If you use SDXC cards, or if you prefer to skip the firmware update step and prepare all your cards from the PC, you may copy ML files on your card and make it bootable with a special utility: EOScard for Windows, MacBoot for Mac, or make_bootable.sh for Mac/Linux in command line.
Updating Magic Lantern
- To update to v2.3 from an earlier version, format your card(s), update to latest Canon firmware if needed, unzip new ML files and make the card(s) bootable. If you get stuck, do a fresh install.
- Check the Download page for updates.
- To install a nightly build or an experimental version, just unzip (or copy) the modified Magic Lantern files on your card and overwrite the old ones.
Uninstalling Magic Lantern
 Don't just delete the Magic Lantern files from the card! If you do, the camera will freeze at startup and you'll have to take the battery out.
Uninstalling ML from one card
- Format that card from the camera (select this option: Format card, remove Magic Lantern) and reboot. Your camera will load the original firmware when you use that card.
Uninstalling ML from the camera
- With a Magic Lantern card, launch the Firmware Update process and follow the instructions on-screen.
- Re-installing Canon firmware will not remove Magic Lantern.
Troubleshooting
- If the card LED blinks continuously after running Firmware Upgrade, you don't have the right Canon firmware version or sub-version. To fix it, install the official Canon firmware upgrade from these links, even if you already have the correct version number (you may have a different sub-version number).
- If the screen does not turn on, but autofocus works, remove the battery and format the card. This happens when the card is bootable, but autoexec.bin is not there.
- Check if all doors are closed. The camera will not boot if any of the card or battery doors are open !
- If the camera does not boot (seems dead), remove the battery and the card. Then put the battery back and try to boot the camera without card. Then put a formatted card in the camera and try to boot without Magic Lantern. Only after you are sure the camera is OK, you can try to see what's wrong with Magic Lantern.
- If the camera asks for a firmware update, place Canon firmware on the card (this was a problem in older versions).
- DO NOT use a bootable card without a working autoexec.bin on it! If you do, remove the battery immediately, switching the camera off is not enough !!!
- Check the issue tracker for similar problems; if you can't find the solution, create a new issue there.
Important notes
- After opening the card door, always wait for LED confirmation (or for 5 seconds) before removing the card!!! (no such problem on 550D)
- EyeFi cards may not work; you must use plain SD / SDHC / SDXC / CF cards.
- If you have a bootable card and have the
BOOTDISKflag set in the camera (which the installer does), and you do not have anAUTOEXEC.BINfile on the card, the camera WILL NOT BOOT! It will hang and not wake up until the battery is removed. - If you encounter a “locked up” camera, quickly remove the battery.
- When in doubt, remove the battery and reboot.
- And, remember that this software can damage or destroy your camera.