This is an old revision of the document!
Table of Contents
:install-header&nofooter
Magic Lantern Nightly - Install Guide
For the impatient: just follow the quick install guide from the download page. For a more thorough description of the install process, including what to do when things go wrong, keep reading.
Before installing Magic Lantern you need to:
- Know how to use a computer (how to download a file, how to unzip an archive, how to browse the web and read the forum…)
- Use your camera without ML for a few months. When you are confortable with Canon firmware, consider installing Magic Lantern.
- Do your research. There is a lot of information available on this site. Read the user guide, the FAQ, and browse the forum.
- Be patient. Magic Lantern can overwhelm with the amount of functions added. But it is actually very easy to use once you know the basics.
Very important
- Never delete the Magic Lantern files from the card! Format the card instead.
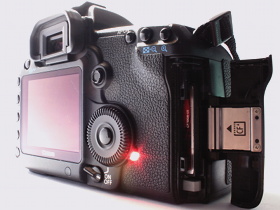
- After opening the card door, always wait for LED confirmation (or for 5 seconds) before removing the card, even if your camera is turned off!!!
Right after opening the card door, Canon firmware accesses the card without turning on the LED (yes, with the main switch turned off). If you remove the card too early, the camera will freeze and will drain the battery, or even cause permanent damage! You will be running random code (remember you are loading executable code from the card), and we can't do anything about it without reflashing Canon firmware with our own code.
Get the right firmware version
- Go to http://builds.magiclantern.fm/ and download the Magic Lantern zip file for your camera
- Make sure you are running the right Canon firmware version, specified on the download page
- You can check your firmware version by setting your mode dial to Manual (M) and looking in the Canon menu.
- Nothing bad will happen if you try to run ML on a different firmware version - the card LED will start blinking and you'll have to take the battery out. Magic Lantern checks firmware version before attempting to run.
First install guide
Step 1. Preparing your camera
- Use a fully charged Canon battery (original, not third party);
- Remove any accessories from your camera (such as battery grip or external flash);
- Make sure you have a card reader.
- Double-check your Canon firmware version.
- Rotate your mode dial to Manual (M) position.
- Recommended: Restore your camera to default settings (
Clear settings, see picture above). Remember this will reset all canon settings and removes custom picture styles!
Step 2. Installation

- Format the card in the camera (low-level format).
- Unzip all of the files from Magic Lantern zip archive to the root of your card.
- Launch the Firmware Update process and follow the messages on the screen.
- Once you see the green confirmation screen, restart your camera. Done.
- If anything goes wrong, check the Troubleshooting section.
Step 3. Magic Lantern first startup
- Go to Canon menus and restore your preferences. Don't forget these:
- On 550D/60D/600D, enable manual video exposure.
- On 5D Mark II and 50D, enable LiveView shooting.
- You may also have to re-install your custom picture styles.
- In LiveView, toggle the INFO/DISP button until you see the Magic Lantern audio levels and footer bar.
- Press the DELETE button to open ML menu and READ THE HELP TEXT that pops up.
- Read the User Guide and start using Magic Lantern.
- Don't forget to wait for LED confirmation before removing the card! (unless you use a 550D)
Installing Magic Lantern on other cards
- Simply repeat Step 2 on every card you would like to use Magic Lantern.
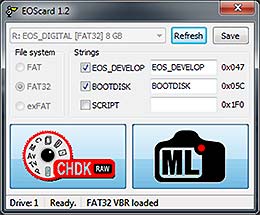
- If you prefer to skip the firmware update step and prepare your cards from the PC, you may copy ML files on your card and make it bootable with a special utility: EOScard for Windows, MacBoot for Mac, or make_bootable.sh for Mac/Linux in command line.
Updating Magic Lantern
- Simply delete your old Magic Lantern files from your card and copy the new ones.
- You can keep your configuration files (the ML/SETTINGS directory from your card).
Uninstalling Magic Lantern
Don't just delete the Magic Lantern files from the card! If you do, the camera will freeze at startup and you'll have to take the battery out.
Uninstalling ML from one card
- Format that card from the camera (select this option: Format card, remove Magic Lantern) and reboot. Your camera will load the original firmware when you use that card.
Uninstalling ML from the camera
- With a Magic Lantern card, launch the Firmware Update process and follow the instructions on-screen.
- Re-installing Canon firmware will not remove Magic Lantern.
Troubleshooting
- If the card LED blinks continuously AND the camera is unresponsive, please report an issue and show us the LED blinking sequence (a short video will do). In older versions, this used to mean “wrong firmware version”, but new builds are now able to show a message on the screen, regardless of your Canon firmware version.
- If you have a different Canon firmware version, please use the one from our download page (select camera, scroll to Installation).
- If the screen does not turn on, but autofocus works, remove the battery and format the card. This happens when the card is bootable, but autoexec.bin is not there.
- Check if all doors are closed. The camera will not boot if any of the card or battery doors are open !
- If the camera does not boot (seems dead), remove the battery and the card. Then put the battery back and try to boot the camera without card. Then put a formatted card in the camera and try to boot without Magic Lantern. Only after you are sure the camera is OK, you can try to see what's wrong with Magic Lantern.
- If the camera asks for a firmware update, place Canon firmware on the card (this was a problem in older versions).
- DO NOT use a bootable card without a working autoexec.bin on it! If you do, remove the battery immediately, switching the camera off is not enough !!!
- Check the issue tracker for similar problems; if you can't find the solution, create a new issue there.
Important notes
- After opening the card door, always wait for LED confirmation (or for 5 seconds) before removing the card!!!
- EyeFi cards may not work; you must use plain SD / SDHC / SDXC / CF cards.
- If you have a bootable card and have the
BOOTDISKflag set in the camera (which the installer does), and you do not have anAUTOEXEC.BINfile on the card, the camera WILL NOT BOOT! It will hang and not wake up until the battery is removed. - If you encounter a “locked up” camera, quickly remove the battery.
- When in doubt, remove the battery and reboot.
- And, remember that this software can damage or destroy your camera.