chs:install
This is an old revision of the document!
Table of Contents
:install-header&nofooter
魔灯夜间构建 - 安装指南
中文译者的话:本文未完全翻译完成!!这只是我一个普普通通的小学生熬夜翻出来的,如果翻译有不恰当的地方请及时指出,谢谢! 对于觉得自己不会装魔灯的人: 只要照着快速安装指南 下载页面 。 如果需要安装过程的详细描述, 或者出现错误要怎么办,请继续看下去。
在安装魔灯前你需要:
- 知道怎样使用电脑 (如何下载文件, 怎样解压压缩包, 如何浏览网页 和翻阅论坛……)
- 在没有魔灯的情况下用你的相机数月。 (中文译者注:我不知道为什么要特别说明脱离魔灯) 当你熟悉各项设置,可以在佳能固件上舒舒服服的用你的相机的时候, 再来考虑装魔灯固件。
- 要有耐心。魔灯有很多好康的插件。但是它们其实非常简单,你只要用过一次就会登dua郎力。
这资料,十分滴重要,应该让新手们先看
- 你可以在相机设为 Manual (M) 时按下menu打开设置来查看固件版本.
- 在你试图在魔灯不同的固件版本上运行魔灯不会发生任何机毁人亡的事故。魔灯会在启动前检查相机的固件版本。如果你就是头铁要试一试,魔灯将会把一个错误对话框怼你脸上,但在拔掉电池后重启相机不会有任何变化。如果你使用比较旧的魔灯版本,你的相机只会让LED灯不断的闪烁,但你还是要重新安装电池。 请打开电池仓盖,按住SET键,合上电池仓盖,拨动开关开机,你会发现相机没有加载魔灯,不过这在每次开关机或打开电池仓盖时都要再做一遍,如果想要永久在卡上移除魔灯,请移除卡的引导标识。 ——WBOX4如实说道
首次安装魔灯指南
步骤 1. 让你的相机准备就绪
- 使用一块 充满电的佳能电池 (原厂, 不是第三方电池) 我在绿巨能电池上成功了,但现在我的绿巨能电池在学校好像弄丢了,焯! ——译者注;
- 移除所有的相机配件 (例如电池手柄和外置闪光灯);
- 确保你有一个读卡器.
- 确保你的相机固件版本使用于魔灯.
- 将模式转盘转到Manual (M)档.
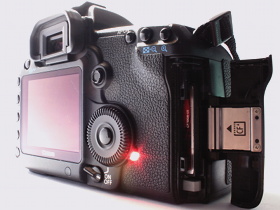
- 建议: 将你的相机恢复出厂设置 (
干净设置, see picture above). 这将复原你的所有佳能菜单里的设置和图片预设!
步骤 2. 安装

- 在相机中格式化存储卡 (低级格式化).
- 解压 所有 魔灯压缩包中的文件到存储卡的根目录中.
- 启动固件更新程序并且按照屏幕上的提示进行操作.
- 当你看到绿色确认程序, 重启你的相机.
- 如果出了什么问题, 查看Troubleshooting部分.
步骤 3. 魔灯首次配置
- 打开佳能设置界面然后恢复你在之前的设置. 不要忘掉下面的事情:
- 在550D/60D/600D上, 启用视频手动曝光.
- 在5D Mark II and 50D上,启动实时取景拍摄.
- 你可能也需要重装照片风格预设.
- 在实时取景中, 不断点击 INFO/DISP 按钮知道你看到魔灯音频电平和页脚栏.
- 单击垃圾桶 按钮来打开魔灯菜单并且阅读帮助文档。
- 阅读用户指南,然后开始使用魔灯!
- 在取出卡之前,不要忘记等待LED熄灭! (除了550D)
在别的卡上安装魔灯
- 在每一张存储卡上重复步骤 2。
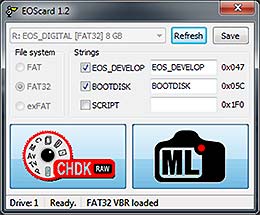
- 如果你希望跳过固件更新程序在电脑上准备卡, you may copy ML files on your card and make it bootable with a special utility: EOScard for Windows, MacBoot for Mac, or make_bootable.sh for Mac/Linux in command line.
This table below explains where magic strings must be written depending on FAT version (done by tools above):
| FAT version | Volume Label = “EOS_DEVELOP” | Bootcode+2 = “BOOTDISK” | “SCRIPT” |
|---|---|---|---|
| FAT12/16 | 0x2b/43 | 0x40/64 | 0x1f0 |
| FAT32 | 0x47/71 | 0x5c/92 | 0x1f0 |
| ExFAT | 0x82/130 | 0x7a/122 | 0x1f0 |
VBR checksums must be updated for ExFat
SCRIPT is for Canon basic.
Updating Magic Lantern
- Simply delete your old Magic Lantern files from your card and copy the new ones.
- You can keep your configuration files (the ML/SETTINGS directory from your card).
Uninstalling Magic Lantern
Don't just delete the Magic Lantern files from the card! If you do, the camera will freeze at startup and you'll have to take the battery out.
Uninstalling ML from one card
- Format that card from the camera (select this option: Format card, remove Magic Lantern) and reboot. Your camera will load the original firmware when you use that card.
Uninstalling ML from the camera
- With a Magic Lantern card, launch the Firmware Update process and follow the instructions on-screen.
- Re-installing Canon firmware will not remove Magic Lantern.
Troubleshooting
- If the card LED blinks continuously AND the camera is unresponsive, please report an issue and show us the LED blinking sequence (a short video will do). In older versions, this used to mean “wrong firmware version”, but new builds are now able to show a message on the screen, regardless of your Canon firmware version.
- If you have a different Canon firmware version, please use the one from our download page (select camera, scroll to Installation).
- If the screen does not turn on, but autofocus works, remove the battery and format the card. This happens when the card is bootable, but autoexec.bin is not there.
- Check if all doors are closed. The camera will not boot if any of the card or battery doors are open !
- If the camera does not boot (seems dead), remove the battery and the card. Then put the battery back and try to boot the camera without card. Then put a formatted card in the camera and try to boot without Magic Lantern. Only after you are sure the camera is OK, you can try to see what's wrong with Magic Lantern.
- If the camera asks for a firmware update, place Canon firmware on the card (this was a problem in older versions).
- DO NOT use a bootable card without a working autoexec.bin on it! If you do, remove the battery immediately, switching the camera off is not enough !!!
- Check the issue tracker for similar problems; if you can't find the solution, create a new issue there.
- If you get “ML directory not found! Please copy all ML files.” during installation → FAQ.
Important notes
- After opening the card door, always wait for LED confirmation (or for 5 seconds) before removing the card!!!
- Early generation EyeFi cards may not work; other WiFi cards may work properly.
- SD-to-CF adapters are not supported!
- If you have a bootable card and have the
BOOTDISKflag set in the camera (which the installer does), and you do not have anAUTOEXEC.BINfile on the card, the camera WILL NOT BOOT! It will hang and not wake up until the battery is removed. - If you encounter a “locked up” camera, quickly remove the battery.
- When in doubt, remove the battery and reboot.
- And, remember that this software can damage or destroy your camera.
chs/install.1652453770.txt.gz · Last modified: 2022/05/13 16:56 by WBOX4